Complete Guide to Growing Cannabis Indoors for Beginners (Cheap & Affordable)

Mastering the Art of Indoor Cannabis Cultivation: The Complete Guide for Beginners

Welcome to the fascinating world of indoor cannabis cultivation! Whether you’re a medical patient seeking a consistent supply of therapeutic herbs or a cannabis enthusiast eager to explore the nuances of different strains, growing marijuana indoors offers an exciting journey filled with learning and discovery. In this extensive guide, we’ll delve deep into the intricacies of cultivating cannabis indoors, covering every aspect from seedling to harvest, and equipping you with the knowledge and skills needed to grow high-quality buds in the comfort of your own home.

                     Getting Started: Understanding the Basics

    • Know the Legal Landscape: Before embarking on your growing journey, familiarize yourself with the laws and regulations governing cannabis cultivation in your region.
    • To familiarize yourself with cannabis laws in your state, you can visit official government websites or reputable legal resources that provide up-to-date information on marijuana regulations. Here are some recommended steps and websites to help you navigate cannabis laws in your state:
      1. State Government Website: Visit the official website of your state’s government and navigate to the section dedicated to cannabis laws, regulations, or the department responsible for overseeing marijuana policies. This is often found within departments such as the Department of Health, Department of Revenue, or a specific cannabis regulatory agency.A really good website I found is

        https://norml.org/laws/

        They show a map of the united states and you can click on each state to find out your laws. Pretty convenient. For example in my home state of Michigan, under 12 plants for personal use is legal, however it changes the more plants you have in your home. Shockingly, as soon as you have under 20 plants (not for personal use) you can face 4 years jail time catching a felony charge and a $20,000 Max fine!

      2. Medical Marijuana Program Websites: If your state has a medical marijuana program, the program’s website is an excellent resource for information on qualifying conditions, patient registration, caregiver requirements, dispensary locations, and legal protections for medical cannabis patients.
      3. Legalization Advocacy Groups: Organizations advocating for cannabis legalization often provide comprehensive resources on state-specific laws, including summaries of legislation, regulatory updates, and guidance on navigating legal cannabis markets. Examples include the Marijuana Policy Project (MPP) and the National Organization for the Reform of Marijuana Laws (NORML).
      4. Cannabis News Outlets: Stay informed about developments in cannabis policy through reputable cannabis news websites and publications. These sources often cover legislative updates, regulatory changes, and legal challenges related to marijuana laws at the state and federal levels.
      5. Local Government Websites: In addition to state laws, be aware of any local ordinances or regulations that may impact cannabis cultivation, distribution, or consumption in your city or county. Local government websites and municipal codes can provide information on zoning restrictions, business licensing requirements, and other local regulations.

      By utilizing these resources, you can gain a comprehensive understanding of cannabis laws in your state, including provisions related to medical and recreational use, possession limits, cultivation rules, dispensary licensing, taxation, and more. Always ensure that you are referencing the most current and accurate information from reliable sources to stay compliant with applicable laws and regulations to make sure you can have a successful grow!

For a small cannabis grow, you’ll need several essential items to ensure successful cultivation. Here’s a comprehensive list of everything you need:

Grow Space: Determine where you’ll be growing your cannabis plants. This could be a small closet, spare room, grow tent, or dedicated indoor grow space.

Lighting: Choose an appropriate lighting setup for your grow space. For a small grow, LED grow lights are efficient and effective. Make sure to select lights with the right spectrum and intensity for each stage of growth. We’ll get into our choice of light for a small grow down below 🙂

Ventilation: Install fans for air circulation and exhaust to remove heat and humidity from your grow space. A small inline fan and carbon filter can help control odors if necessary.

Growing Medium: Select a suitable growing medium for your plants, such as soil, coco coir, or hydroponic substrate. Ensure good drainage and aeration for healthy root development.

Containers or Pots: Fabric pots or plastic containers are commonly used for growing cannabis. Choose pots of appropriate size for your plants and growing medium.

Nutrients: Cannabis plants require essential nutrients for healthy growth. Choose high-quality fertilizers or nutrient solutions formulated for cannabis and follow the manufacturer’s recommendations.

pH Testing Kit: Monitor and adjust the pH of your water and nutrient solution to ensure optimal nutrient uptake by the plants. pH testing kits or pH meters are essential for maintaining proper pH levels.

Watering Supplies: Have watering cans, spray bottles, or a small watering system on hand to provide water and nutrients to your plants as needed. Ensure that your water source is clean and free from contaminants.

Temperature and Humidity Monitor: Keep track of temperature and humidity levels in your grow space using a thermometer and hygrometer. Aim for temperature ranges of 70-85°F (21-29°C) and humidity levels of 40-60% during the vegetative stage and 40-50% during the flowering stage.

Training Tools (Optional): Consider using training techniques such as topping, low-stress training (LST), or defoliation to shape and optimize plant growth. Tools like plant ties, scissors, and stakes may be needed for training.

Pest and Disease Control: Have pest control measures in place, such as neem oil or insecticidal soap, to prevent and treat pest infestations. Keep your grow space clean and monitor plants regularly for signs of pests or diseases.

Harvesting and Drying Supplies: Plan ahead for harvesting and drying your cannabis buds. You’ll need sharp scissors or pruning shears for harvesting, as well as drying racks or screens and a well-ventilated area for drying.

By gathering these essential items, you’ll be well-equipped to start and maintain a successful small cannabis grow. Be sure to research and educate yourself on best practices for each stage of the growing process to ensure a healthy and bountiful harvest.

SO let’s begin 🙂

Choosing the right cannabis Strain (what seeds you get)

With countless varieties available, you should consider factors such as cannabinoid content, growth characteristics, and space limitations when selecting the perfect strain for your indoor garden. Below are some places where you can purchase seeds online. My recommendation is you go with the best sellers or cannabis cup winners.

      1. ILGM (I Love Growing Marijuana): ILGM is a well-known seed bank that offers a variety of cannabis seeds, including feminized, autoflowering, and high-CBD strains. They provide discreet shipping and guaranteed delivery options for customers in the United States.Learn more about ILGM by clicking here:
        ILGM
      2. Crop King Seeds: Crop King Seeds is a trusted seed bank with a diverse selection of cannabis genetics, including popular strains and award-winning hybrids. They offer worldwide shipping, including to the United States, and prioritize customer privacy and satisfaction.Learn more about Crop King Seeds by clicking here:
        Crop King Seeds
      3. Seedsman: Seedsman is a reputable seed bank that features a vast catalog of cannabis seeds from renowned breeders and seed banks worldwide. They offer discreet shipping options and a seed-to-harvest guarantee for customers in the United States.Learn more about Seedsman seeds by clicking here:
        Seedsman
      4. MSNL (Marijuana Seeds NL): MSNL is a long-standing seed bank known for its extensive collection of premium cannabis seeds, including regular, feminized, and autoflowering varieties. They provide fast and discreet shipping to customers in the United States.Learn more about MSNL seeds by clicking here:
        MSNL
      5. True North Seed Bank: True North Seed Bank offers a diverse range of cannabis seeds from top breeders, with an emphasis on quality and reliability. They provide worldwide shipping, including to the United States, and discreet packaging for customer privacy.Learn more about True Norther Seed Bank by clicking here:
        True North Seed Bank
      6. Attitude Seed Bank: The Attitude Seed Bank is a well-established online retailer that offers a broad selection of cannabis seeds from leading breeders and seed banks. They offer discreet shipping and a delivery guarantee for customers in the United States.Learn more about Attitude Seed Bank by clicking here:
        Attitude Seed Bank
      7. Seed Supreme: Seed Supreme is a reputable seed bank that offers a comprehensive selection of cannabis seeds, including regular, feminized, and autoflowering strains. They provide worldwide shipping, including to the United States, and discreet packaging for customer privacy.Learn more about Seed Supreme by clicking here:
        Seed Supreme
      8. Pacific Seed Bank: Pacific Seed Bank is a California-based seed bank that offers a wide range of cannabis seeds, including high-CBD strains and popular hybrids. They provide discreet shipping and guaranteed delivery options for customers in the United States.Learn more about Pacific Seed Bank by clicking here:
        Pacific Seed Bank

On these sites, you will find there are several different types of marijuana seed types available! They each have their own unique characteristics and advantages. Below I explain the differences 🙂

Regular Seeds: Regular seeds are the most basic and natural form of cannabis seeds. They have a 50/50 chance of developing into male or female plants, making them ideal for breeding purposes or for growers who prefer to work with the plant’s natural genetic variability.

Feminized Seeds: Feminized seeds are selectively bred to produce only female plants, eliminating the need to identify and remove male plants during the growing process. This ensures that all plants will produce buds, making feminized seeds popular among growers looking to maximize their yield.

Autoflowering Seeds: Autoflowering seeds contain genetics from the Cannabis ruderalis species, which allows the plants to automatically transition from the vegetative stage to the flowering stage without changes in light cycles. This makes autoflowering seeds ideal for growers looking for a fast-growing, low-maintenance option that doesn’t require precise light control. (“My Best Grow” recommended)

Photoperiod Seeds: Photoperiod seeds require a specific light cycle (usually 12 hours of light followed by 12 hours of darkness) to trigger the flowering stage. These seeds are preferred by growers who want more control over the growth cycle of their plants, allowing for longer vegetative periods and potentially larger yields.

High-CBD Seeds: High-CBD seeds are specifically bred to produce plants with higher levels of cannabidiol (CBD), a non-psychoactive compound known for its potential therapeutic effects. These seeds are popular among medical marijuana patients seeking relief from conditions such as chronic pain, inflammation, anxiety, and seizures.

High-THC Seeds: High-THC seeds are bred to produce plants with elevated levels of tetrahydrocannabinol (THC), the psychoactive compound responsible for the euphoric “high” associated with marijuana use. These seeds are favored by recreational users seeking potent and intoxicating effects.

Hybrid Seeds: Hybrid seeds are created by crossing two or more distinct cannabis strains, resulting in offspring that exhibit a combination of traits from their parent plants. Hybrids can be bred for a wide range of characteristics, including flavor, aroma, potency, and growth characteristics.

When choosing marijuana seeds, consider factors such as desired cannabinoid profile, growth characteristics, flowering time, and intended use (medical or recreational). More than likely, you are not new to cannabis if you are looking up how to grow it, so just go with the most popular auto-flower strain for your first small grow 🙂

cannabis plant

Before making a purchase, I have to reiterate that it’s essential to research the laws and regulations governing the purchase and possession of cannabis seeds in your state. Additionally, consider factors such as seed quality, breeders’ reputation, shipping options, and customer reviews when selecting a seed bank. Always ensure that you are purchasing seeds from a reputable source to guarantee authenticity and quality.


Next we’ll dive into germinating your seeds (The first step!)

Here’s a step-by-step guide on how to germinate marijuana seeds effectively:

    Gather Your Supplies:

    • Marijuana seeds (preferably auto-flower if this is your first grow)
    • Paper towels or coffee filters
    • Plate or tray

Distilled water or tap water that has been left to sit for 24 hours to dissipate chlorine

Prepare the Germination Medium:

Moisten a paper towel or coffee filter with water, ensuring it’s damp but not soaking wet.

Place the moistened paper towel or coffee filter on a plate or tray.

Prepare the Seeds:

Carefully select your marijuana seeds, ensuring they are mature and viable. Discard any damaged or immature seeds.

Place the seeds evenly spaced on the moistened paper towel or coffee filter, leaving some space between them.

Cover and Maintain Moisture:

Gently fold the paper towel or coffee filter over the seeds to cover them.

If necessary, lightly mist the paper towel or filter with water to maintain moisture, being careful not to oversaturate it.

Create a Warm, Dark Environment:

Place the plate or tray with the covered seeds in a warm, dark location, such as on top of a refrigerator or in a cupboard.

Avoid direct sunlight, as excessive heat can dry out the germination medium and damage the seeds.

Check for Germination:

    • Check the seeds daily to monitor their progress.
    • Seeds typically germinate within 24-72 hours, although some may take longer.
    • Look for the seeds to crack open and tiny white taproots to emerge from the seeds.

      check on your seeds!

Transplant Germinated Seeds:

    • Once the seeds have germinated and developed taproots that are at least 1/4 to 1/2 inch long, they are ready to be transplanted into your growing medium.
    • Use tweezers or your fingers to carefully transfer the germinated seeds to your growing medium, placing them taproot-down with the seed coat pointing upward.
    • Gently cover the seeds with a thin layer of soil or growing medium, being careful not to bury them too deep.
    • germinated seed

       Provide Light and Water:

    • After the seeds germinate, you will be transplanting seedlings to a solo cup where you will provide gentle light and water to the newly planted seeds.


transfer the seedling to a solo cup


    • Use a spray bottle to mist the growing medium lightly, keeping it moist but not waterlogged.
    • Provide low-intensity light, such as fluorescent or LED grow lights, until the seedlings have developed their first set of true leaves.
    • after 1-2 weeks your seedling should have its first leaves at which point it’s time to transfer to a pot.

Seedling is now ready to be transferred to bigger pot

By following these steps, you can successfully germinate marijuana seeds and start your cannabis grow with healthy, vigorous seedlings ready for the vegetative stage. Remember to handle the seeds and seedlings with care to avoid damaging them during the germination process.

Okay, so you germinated your seeds, watched the seedling grow in a solo cup, now it’s time to transfer the young plant into soil and a bigger pot.

 POTS

When it comes to selecting fabric pots for indoor marijuana cultivation, there are several factors to consider, including durability, size, drainage, and air pruning capabilities. Here are some of the best fabric pots commonly used by indoor growers:

Smart Pots: Smart Pots are a popular choice among indoor cannabis cultivators. Made from a durable geotextile fabric, Smart Pots promote healthy root growth by allowing for air pruning, which prevents root circling and promotes root branching. They come in various sizes, from small containers for seedlings to large pots for mature plants.

VIVOSUN Fabric Pots: VIVOSUN Fabric Pots are made from heavy-duty non-woven fabric that promotes optimal root development and prevents root circling. These pots feature reinforced stitching and sturdy handles for easy handling. VIVOSUN offers a range of sizes to suit the needs of indoor cannabis growers. (“My Best Grow” recommended)

Vivosun fabric pots

Gro Pro Premium Fabric Pots: Gro Pro fabric pots are made from high-quality, breathable fabric that promotes air pruning and root health. These pots feature reinforced seams and handles for durability and ease of use. Gro Pro offers a variety of sizes to accommodate different plant sizes and growing setups.

When choosing fabric pots for indoor marijuana cultivation, consider factors such as size (We recommend 5 gallon pots for one plant) durability, drainage, and airflow to ensure optimal growing conditions for your plants. Additionally, investing in quality fabric pots can contribute to healthier root systems, increased yields, and overall better plant performance.

SOIL

Wonder Soil has a 4.5 rating on amazon with over 2000 Reviews! (Recommended)

Selecting the right soil for your cannabis plants is crucial for their overall health and growth. You’ll want a soil that provides essential nutrients, proper drainage, and a balanced pH level. Here are some considerations when choosing soil for your cannabis plants:

  1. Potting Mix vs. Soil: While you can use regular garden soil for cannabis cultivation, it’s generally recommended to use a high-quality potting mix specifically formulated for container gardening. Potting mixes are lighter and offer better drainage, which helps prevent waterlogging and root rot.
  2. Nutrient Content: Look for potting mixes that contain a balanced blend of organic materials, such as compost, peat moss, coco coir, and perlite or vermiculite. These materials provide essential nutrients and improve soil structure, promoting healthy root development and vigorous growth.
  3. pH Level: Cannabis plants thrive in slightly acidic soil with a pH level between 6.0 and 7.0. Choose a potting mix with a pH-balanced formulation or adjust the pH of your soil as needed using pH-adjusting products.
  4. Pre-fertilized vs. Unfertilized: Some potting mixes come pre-fertilized with nutrients, which can be convenient for beginner growers. However, these mixes may contain synthetic fertilizers or high levels of nutrients that can be too strong for young seedlings. If using a pre-fertilized mix, consider diluting it with additional perlite or coco coir to reduce nutrient strength. Alternatively, you can opt for an unfertilized potting mix and supplement with organic fertilizers as needed throughout the grow cycle.
  5. Organic vs. Synthetic: Organic potting mixes contain natural ingredients and beneficial microorganisms that promote soil health and microbial activity. They are free from synthetic chemicals and pesticides, making them a preferred choice for many organic growers. However, synthetic potting mixes may offer more precise control over nutrient levels and pH.
  6. Moisture Retention: Choose a potting mix with good moisture retention properties to ensure that your cannabis plants have access to water between waterings. However, avoid soils that retain too much moisture, as this can lead to overwatering and root rot. Adding perlite or vermiculite to your potting mix can help improve drainage and prevent waterlogged soil.

Some popular brands of potting mixes that are commonly used for cannabis cultivation include FoxFarm Ocean Forest, Pro-Mix, Happy Frog, Roots Organics, and Coco Coir-based mixes like Wonder Soil, Canna Coco or Mother Earth Coco. Experimenting with different soil blends and amendments can help you find the best soil mix for your specific growing conditions and preferences.

Setting Up Your Grow Space.

We recommend growing in tents like the ones we have listed on this website under cheap grow tent kits. Creating an optimal environment with proper ventilation, lighting, and temperature control is crucial for success (and grow tents can help you do just that!).

The best tent size for a cannabis grow depends on various factors, including the number of plants, available space, growing technique, and personal preferences. Here are some common tent sizes along with considerations for each:

Small Tents (2′ x 2′ to 3′ x 3′):

    • Suitable for beginners or growers with limited space.
    • Ideal for growing 1-4 small to medium-sized plants.
    • Compact size makes them easy to set up and manage.
    • Suitable for growers using techniques like SOG (Sea of Green) or SCROG (Screen of Green) to maximize space utilization.
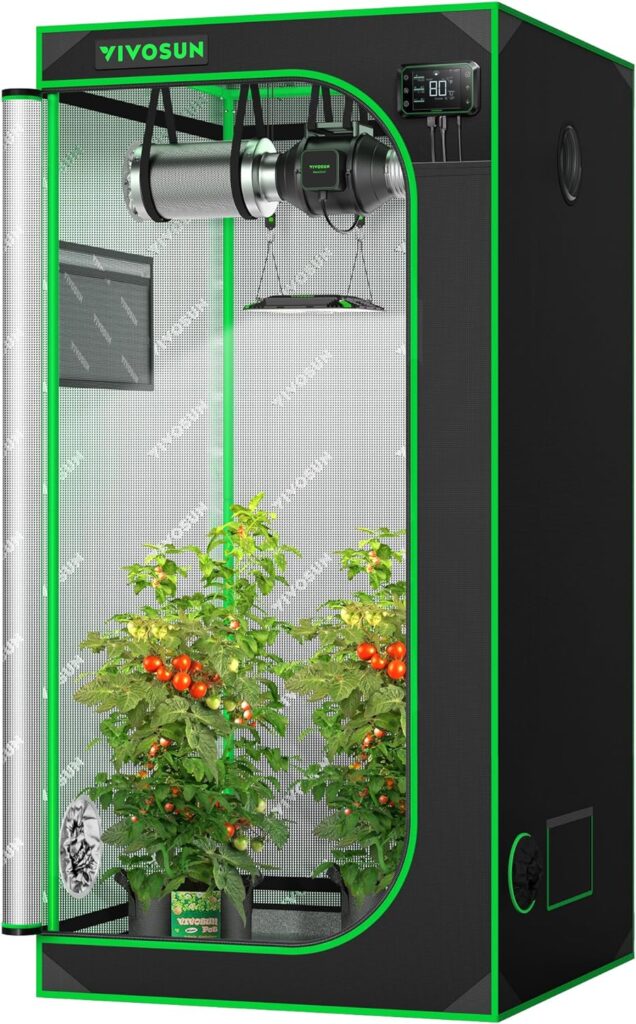
    • We recommend the Vivosun 3×3 Tent on amazon with over 28,000 reviews.

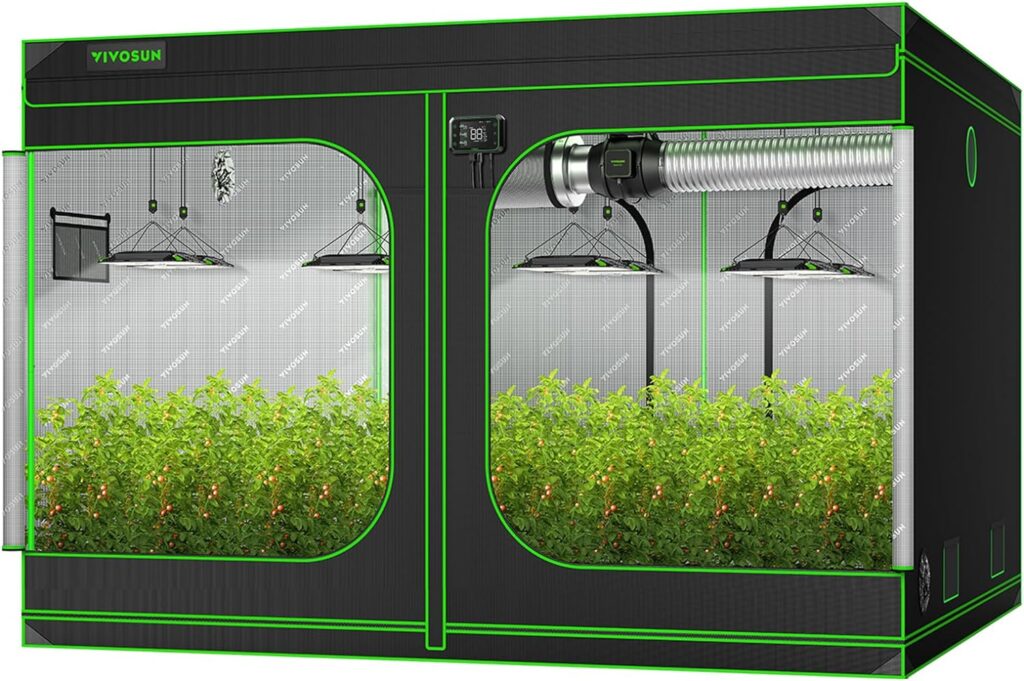
  1. Medium Tents (4′ x 4′ to 5′ x 5′):
    • Versatile size suitable for a wide range of grow setups.
    • Can accommodate 4-9 medium-sized plants or fewer larger plants.
    • Provides ample space for training techniques like LST (Low Stress Training) or topping.
    • Allows for efficient use of grow lights and ventilation equipment.
    • 5×5 tent

  2. Large Tents (5′ x 9′ to 8′ x 8′ or larger):
    • Ideal for experienced growers or those with ample space.
    • Can accommodate 9-16 or more plants, depending on size and growing technique.
    • Provides plenty of room for larger plants to spread out and develop extensive root systems.
    • Allows for more advanced growing techniques such as main-lining or super cropping.
    • Large Tent


When selecting a tent size for your cannabis grow, consider factors such as the number of plants you plan to grow, available space in your growing area, and your budget. It’s essential to ensure that the tent size allows for adequate spacing between plants to promote airflow and prevent overcrowding, which can lead to issues such as mold or pest infestations (Yuck!). Additionally, choose a tent size that accommodates your chosen growing technique and equipment, such as grow lights, fans, and carbon filters, while leaving room for easy access and maintenance.

For newbies looking to grow one – four plants, we recommend anything from a 2×2 to a 4×4 tent 🙂

LIGHTING


No grow tent is complete without lighting, so next we’ll go over what you need to properly light your sweet cannabis plants!

For a small-sized cannabis grow, such as a single plant or a few plants in a small grow tent, you’ll want a lighting setup that provides sufficient coverage and intensity while minimizing heat and energy consumption.

For a small cannabis grow (1 to 4 plants), the light we recommend is the Bestva 3000 Watt LED light

Customers like the performance, quality, brightness, and ease of use of the electric light. For example, they mention that it works great with a timer, produces stronger, healthier plants, and is quiet. Customers are also impressed with the delivery, saying that it was well packaged and arrived undamaged. Works great for a 3×3 or 4×4 tent 🙂

Placement: Hang the LED grow light above the canopy of your cannabis plant(s) to ensure even light distribution and maximum coverage. Adjust the hanging height as needed to maintain the optimal distance between the light and the canopy, typically around 12-24 inches (30-60 cm) during the vegetative stage and 6-18 inches (15-45 cm) during the flowering stage.

The Vegetative Phase

During the vegetative stage, provide your plant(s) with 18-24 hours of light per day using the LED grow light to promote vigorous vegetative growth. When transitioning to the flowering stage, switch to a 12/12 light cycle (12 hours of light followed by 12 hours of darkness) to induce flowering and stimulate bud development.

The vegetative stage is a critical phase in the growth cycle of cannabis plants during which they focus on building strong roots, sturdy stems, and lush foliage. This stage precedes the flowering stage and is characterized by vigorous growth and development. Here’s an overview of the vegetative stage of growing cannabis:

Duration: The vegetative stage typically begins when the cannabis plant emerges from the seedling stage and continues until the plant begins to show signs of flowering. The length of the vegetative stage can vary depending on factors such as the cannabis strain, growing conditions, and the desired size of the plant. On average, the vegetative stage lasts anywhere from 2 to 8 weeks, although some growers may choose to extend or shorten this period based on their goals.

Light Cycle: During the vegetative stage, cannabis plants require long hours of light to stimulate growth and development. Most growers provide their plants with 18 to 24 hours of light per day during this stage, although some may opt for a continuous 24-hour light cycle (24/0) to maximize growth rates. The prolonged exposure to light encourages the plants to focus on vegetative growth rather than flowering.

Watering your cannabis plant is crucial, but finding the right balance is key to avoiding overwatering or underwatering. Check the soil moisture by inserting your finger about an inch into the soil. If it feels dry, it’s time to water. Water thoroughly until it begins to drain out of the bottom of the container. Younger plants and smaller containers may need more frequent watering. Allow the soil to dry slightly between waterings to prevent overwatering. Pay attention to environmental factors like temperature and humidity, as they can affect water absorption. Use clean, pH-balanced water at room temperature. Regularly monitor your plants for signs of stress or dehydration and adjust your watering schedule accordingly.

Nutrient Requirements

Cannabis plants have specific nutrient requirements during the vegetative stage to support healthy growth and development. They need higher levels of nitrogen (N) to promote leaf and stem growth, as well as other essential macronutrients and micronutrients. Many growers use balanced fertilizers formulated for vegetative growth or supplement with additional nutrients as needed.

Cannabis plants have specific nutrient requirements throughout their growth cycle to support healthy development and maximize yields. Here are the primary nutrients essential for cannabis plants and their roles:

  1. Nitrogen (N): Nitrogen is crucial for vegetative growth, leaf development, and overall plant vigor. During the vegetative stage, cannabis plants require higher levels of nitrogen to support rapid foliage growth and establish a strong foundation. Look for fertilizers with a higher ratio of nitrogen (N) for the vegetative stage.
  2. Phosphorus (P): Phosphorus is essential for root development, flower formation, and energy transfer within the plant. During the flowering stage, cannabis plants require higher levels of phosphorus to support bud development and enhance flowering. Look for fertilizers with a higher ratio of phosphorus (P) for the flowering stage.
  3. Potassium (K): Potassium plays a vital role in overall plant health, stress resistance, and nutrient uptake. It helps regulate water uptake, enzyme activation, and carbohydrate metabolism. Potassium is important throughout all stages of growth, but especially during flowering to support flower development and improve bud quality.
  4. Calcium (Ca) and Magnesium (Mg): Calcium and magnesium are secondary nutrients that are essential for healthy plant growth and development. They help regulate nutrient uptake, enzyme activation, and cell structure. Calcium deficiency can lead to issues such as blossom end rot, while magnesium deficiency can cause yellowing of the leaves.
  5. Sulfur (S): Sulfur is another secondary nutrient that plays a role in chlorophyll production, enzyme activation, and protein synthesis. It also helps improve plant metabolism and overall plant health.
  6. Micronutrients: In addition to the primary nutrients mentioned above, cannabis plants also require trace amounts of micronutrients such as iron (Fe), manganese (Mn), zinc (Zn), copper (Cu), boron (B), and molybdenum (Mo). These micronutrients are essential for various physiological processes within the plant, including photosynthesis, hormone regulation, and enzyme activity.

When choosing nutrients for your cannabis plants, look for products specifically formulated for cannabis cultivation and designed to meet the plant’s nutritional needs at each stage of growth (vegetative, flowering, and transition). Follow the manufacturer’s recommendations for application rates and frequency, and be cautious not to over-fertilize, as this can lead to nutrient burn or other issues. Additionally, consider using organic or natural-based fertilizers to minimize the risk of chemical buildup and promote soil health over time.

For big glorious plants, We recommend General Hydroponics Nutrients. We like the quality, value, ease of use, and nutrients of the fertilizer. It’s simple to use and makes a big difference in the growth of your cannabis plants. Also there are clear mixing instructions. Overall, it’s a winner!

Picture of General Hydroponics 3 piece nutrient set.

Our recommended nutrients!

Environmental Conditions:

Providing optimal environmental conditions is essential during the vegetative stage to maximize growth rates and ensure healthy plants. as a general note for while you are growing your plants, Cannabis plants thrive in temperatures between 70°F to 85°F (21°C to 29°C) with relative humidity levels around 40% to 70%. Adequate airflow, proper ventilation, and sufficient water and drainage are also crucial for preventing issues such as mold, mildew, and root rot.

Training Techniques

The vegetative stage is an ideal time to implement training techniques such as topping, pruning, or low-stress training to shape and manipulate the growth of the plants. These techniques can help promote bushier growth, increase yields, and optimize light penetration throughout the canopy.

low stress training by tying the plants to the side of the pot

 learn more about low stress training your cannabis plants by visiting the link below

From Seed to Stoned guide on how to Low Stress Train you Cannabis Plant

Overall, the vegetative stage is a vital period in the growth cycle of cannabis plants, laying the foundation for healthy growth and robust bud production during the flowering stage. By providing the proper light, nutrients, and environmental conditions, growers can encourage vigorous vegetative growth and set the stage for a successful harvest.


The Bloom Phase

The flowering stage of cannabis, also known as the bloom phase, is the period during which the plant transitions from vegetative growth to the production of flowers (buds). It’s at this point that you switch your light from vegetative state light mode to bloom light mode. The duration of the flowering stage can vary depending on factors such as the cannabis strain, growing conditions, and desired outcome. On average, the flowering stage of cannabis lasts between 7 to 12 weeks, with some strains flowering for as little as 6 weeks or as long as 16 weeks. Here are some factors that can influence the length of the flowering stage:

Strain: Different cannabis strains have varying flowering times, with some strains flowering more quickly than others. Indica-dominant strains tend to have shorter flowering periods, typically around 7 to 9 weeks, while sativa-dominant strains may have longer flowering times, ranging from 10 to 12 weeks or more. Hybrid strains can exhibit a wide range of flowering times depending on their genetic makeup.

Genetics: The genetic characteristics of the cannabis plant play a significant role in determining the length of the flowering stage. Some strains are genetically predisposed to flower more quickly or slowly, regardless of growing conditions.

Light Cycle: The duration of the flowering stage is influenced by changes in the light cycle. Cannabis plants typically begin flowering when they receive 12 hours of uninterrupted darkness each day, signaling the end of the vegetative stage and the onset of flowering. Once flowering has started, maintaining a consistent 12/12 light cycle (12 hours of light followed by 12 hours of darkness) is essential to encourage bud development and prevent interruptions in the flowering process.

Unless you have an autoflowering plant which can receive light 24 hours a day!

Environmental Factors: Environmental conditions such as temperature, humidity, and nutrient availability can affect the rate of bud development and overall flowering time. Providing optimal growing conditions during the flowering stage can help maximize bud production and shorten the duration of flowering.

Nutrient Management: Proper nutrient management is crucial during the flowering stage to support the plant’s increased nutrient demands and promote healthy bud development. Providing the correct balance of macronutrients (nitrogen, phosphorus, potassium) and micronutrients can help optimize flowering times and enhance bud quality.

Flush: Toward the end of the flowering stage, growers may initiate a flush period to remove excess nutrients from the growing medium and improve the taste and quality of the final harvest. During the flush, plants are watered with plain water or a flushing solution to leach out any remaining nutrients from the soil or growing medium.

It’s important to monitor the progress of your cannabis plants closely during the flowering stage and harvest them when the buds have reached their desired level of maturity. Some growers may choose to harvest earlier for a more cerebral or uplifting effect, while others may prefer to wait until the buds have fully matured for a more sedative or relaxing experience.

Humidity Levels

While you are growing it’s important to maintain optimal conditions by investing in fans, humidifiers, dehumidifiers, and temperature controllers to regulate humidity levels, airflow, and temperature fluctuations within your grow space.

The proper humidity level in a cannabis grow tent varies depending on the stage of growth and environmental conditions. Here are some general guidelines for humidity levels in a cannabis grow tent:

Seedling Stage: During the seedling stage, when cannabis plants are young and delicate, it’s essential to maintain relatively high humidity levels to prevent dehydration and promote healthy root development. Aim for a humidity level between 65% to 70% during this stage.

Vegetative Stage: In the vegetative stage, cannabis plants require slightly lower humidity levels to prevent issues such as mold and mildew. Aim for a humidity level between 40% to 60% during the vegetative stage. Higher humidity levels can increase the risk of mold and pest infestations, so it’s crucial to maintain adequate airflow and ventilation.

Flowering Stage: As cannabis plants enter the flowering stage, humidity levels can be gradually reduced to help prevent bud rot and mold formation. Aim for a humidity level between 40% to 50% during the flowering stage. Lower humidity levels can also help improve resin production and overall bud quality.

Environmental Conditions: Environmental factors such as temperature, airflow, and ventilation can affect humidity levels in the grow tent. Make sure to monitor these factors closely and adjust accordingly to maintain optimal humidity levels. Use a hygrometer to measure humidity levels accurately and make adjustments as needed.

Here are some effective methods for controlling humidity levels in your grow tent:

Using a Hygrometer: Place the hygrometer at plant canopy level to get an accurate reading of the humidity experienced by your plants.

here’s an affordable hygrometer by ThermPro!

Install a Dehumidifier: If humidity levels are consistently too high, consider investing in a dehumidifier specifically designed for indoor gardening. Choose a dehumidifier with an appropriate capacity for your grow tent size and set it to maintain the desired humidity level.

Since you are going to be using a small tent, here’s a link to an affordable and highly rated dehumidifier if your levels suggest you need one:

Customers like the noise level and size of the dehumidifier. They mention that it is very quiet and efficient for small kitchen space. They also appreciate ease of use, and humidifier.

Seavon Dehumidifier 2200 Cubic Feet with over 10,000 rating on amazon


Control Watering Practices: Overwatering can contribute to elevated humidity levels in the grow tent, especially during the flowering stage when plants transpire less water. Use a watering schedule based on the specific needs of your plants and allow the soil to dry out between waterings to prevent excess moisture buildup.

Temperature Control: Maintaining optimal temperature levels can indirectly help regulate humidity levels in the grow tent. Warmer air has a higher capacity to hold moisture, so keeping temperatures within the ideal range (typically 70-85°F or 21-29°C) can help prevent humidity spikes.

Seal Tent Gaps and Vents: Ensure that your grow tent is properly sealed to prevent outside air from entering and humidity from escaping. Seal any gaps or leaks in the tent fabric, zippers, or vents using weather-stripping or duct tape to maintain a controlled environment.

Ventilation and Air Circulation


Now that we know how important humidity levels are, let’s take a look at another thing that will impact your plants. Ventilation.

Proper ventilation and air circulation are crucial for maintaining airflow and reducing humidity levels in the grow tent. Use exhaust fans, intake fans, and oscillating fans to promote air exchange and prevent stagnant air pockets where humidity can accumulate.

Here’s what you need to know about ventilation in a cannabis grow tent:

Air Circulation: Adequate air circulation is crucial for preventing stagnant air pockets and ensuring that fresh air reaches all parts of the plants. Use oscillating fans inside the tent to promote air movement and distribute heat evenly. Position the fans to gently move air across the canopy without causing excessive leaf movement.

Intake and Exhaust Fans: Install intake and exhaust fans to create a continuous flow of fresh air into the tent and expel stale air and heat. The intake fan should be placed near the bottom of the tent to draw in cool, fresh air from outside, while the exhaust fan should be positioned near the top to remove hot, humid air from the tent. Use ducting to connect the fans to vent ports or duct holes in the tent fabric.

Carbon Filter: If odor control is a concern, use a carbon filter with your exhaust fan to remove unwanted odors from the air before it’s expelled outside the tent. The carbon filter should be installed inline with the exhaust fan and positioned inside the tent. Replace the carbon filter regularly to maintain its effectiveness.

Ventilation Ports and Ducting: Many grow tents come equipped with ventilation ports or duct holes that allow you to easily connect intake and exhaust fans using flexible ducting. Seal any gaps around the ports or duct holes with duct tape or weather-stripping to prevent air leaks and maintain negative pressure inside the tent.

Temperature and Humidity Control: Proper ventilation helps regulate temperature and humidity levels inside the tent. Monitor these parameters regularly using a thermometer and hygrometer and adjust your ventilation setup as needed to maintain optimal conditions for plant growth. In addition to ventilation, you may also use other methods such as air conditioning or dehumidifiers to control temperature and humidity.

We recommend the 6 inch Vivosun Fan + Carbon Filter for all smaller tents! Customers like the performance and ease of installation of the electric fan. They mention that the unit itself works great, the variable speed control works fine, and the installation was easy. Customers are also satisfied with smell.

By implementing a proper ventilation system in your cannabis grow tent, you can create a healthy and productive environment for your plants to thrive throughout all stages of the growth cycle. Be sure to regularly inspect and maintain your ventilation equipment to ensure optimal performance and prevent issues such as overheating or poor air quality. Don’t forget this crucial step.

So now you’ve properly cared for your cannabis plant, watched it grow from vegetative state to bloom state waited 6-12 weeks, given it a flush and now your plant is ready to harvest! Woo hoo! 🙂

Harvesting

Harvesting your cannabis plant is a crucial step in the cultivation process and requires careful timing and attention to detail to ensure the best possible results. Here’s a step-by-step guide on how to harvest your cannabis plant:

  1. Timing: Determine the optimal time to harvest your cannabis plant based on the desired effects and maturity of the buds. Most growers harvest when the majority of the trichomes (tiny resin glands) on the buds have turned milky white or amber in color, indicating peak cannabinoid and terpene content. Use a magnifying tool such as a jeweler’s loupe or a handheld microscope to inspect the trichomes closely.
  2. Prepare Equipment: Before harvesting, gather all the necessary equipment, including sharp pruning shears or scissors, gloves, containers for storing harvested buds, and a clean, well-ventilated area for trimming.

    We recommend these best selling pruning shears. There’s a Lifetime warranty on these Fiskars!

  3. Cutting: Using sharp pruning shears or scissors, carefully cut each branch of the cannabis plant near the main stem. Start with the lower branches and work your way up to the top of the plant. Be gentle to avoid damaging the buds and handle them carefully to preserve their trichomes.
  4. Trimming: Once the branches are cut, trim away any large fan leaves and excess foliage from the branches. Leave smaller sugar leaves intact, as they contain trichomes and contribute to the potency and flavor of the buds. Some growers prefer to dry-trim their buds before curing, while others prefer to wet-trim immediately after harvesting. We recommend dry trimming!
  5. Drying: Hang the trimmed branches upside down in a cool, dark, and well-ventilated area with a humidity level of around 50-60%. Use a drying rack or clothesline to hang the branches, ensuring that there is space between them for air circulation. Monitor the drying process closely and adjust humidity levels as needed to prevent mold or mildew.

    Hanging your buds to dry

    images from https://www.youtube.com/@MrCanucksGrowGuide.

  6. Curing: After the buds have dried for 5-10 days (or until the smaller stems snap when bent), transfer them to glass jars or airtight containers for curing. Fill the jars with dried buds up to 3/4 full, leaving some room for air circulation. Store the jars in a cool, dark place and burp them daily to release excess moisture and prevent mold. Cure the buds for at least 2-4 weeks, or longer for optimal flavor, aroma, and potency.

  7. Final Preparation: Once the buds are properly cured, they are ready for consumption. Remove any remaining stems or excess foliage and store the cured buds in airtight containers in a cool, dark place away from heat, light, and humidity.

So if you made it this far congratulations, you are now an expert on how to properly do a small grow in your grow tent. Thanks for reading. Prime Broccoli, out!

Note: I am an amazon affiliate and I may receive compensation for any amazon products you buy from my website.

1 Comment
  1. Looks like I’ll be buying a 3×3 tent soon! 🙂 Thanks for finding all the necessary equipment for us.

Leave a reply

Logo
Shopping cart